I remember the first time that we tried making a melted pony bead ornament.
I was terrified to melt pony beads in the oven. After taking a plastics class in college (yes, this communication major passed the class -woot!), I was wondering:
- Would melting pony beads smell bad? (it DOES by the way. I’ll tell you how to avoid at the bottom of this post)
- Would the beads actually melt and at what temperature?
- Would the melted beads permanently adhere to my baking sheet???
I had questions…
And, I was pleasantly surprised with how easy it was to melt pony beads. I’ll share a few tips that will *really* help you at the end of the post.
Don’t miss that list!
But first, here’s how you can make our melted pony bead ornament for kids!

So, what’s my favorite part about this kid-made ornament?
You can make it right now.
Once you have a few supplies, there’s little to no prep for this project. If the kids are itching to make something for the holidays, you can make this ornament so easily and it’s something that they love to add to the tree!
Psst…These would make adorable gift tags too!
What You Need for This Melted Pony Bead Craft
Amazon Affiliate links are in this post so that you can see what we’ve used ~ Disclosure policy here.
- Clear Pony Beads <—affiliate link to a big bag 🙂
- Metal Cookie Cutter <— here’s what we have, but you can also melt these as circle ornaments in a muffin tin
- Yarn or kitchen twine
- Glue gun

How to Make a Melted Pony Bead Craft Ornament
- Preheat your oven to 400 and line your baking sheet with aluminum foil <— you can do it without, but I like adding this step
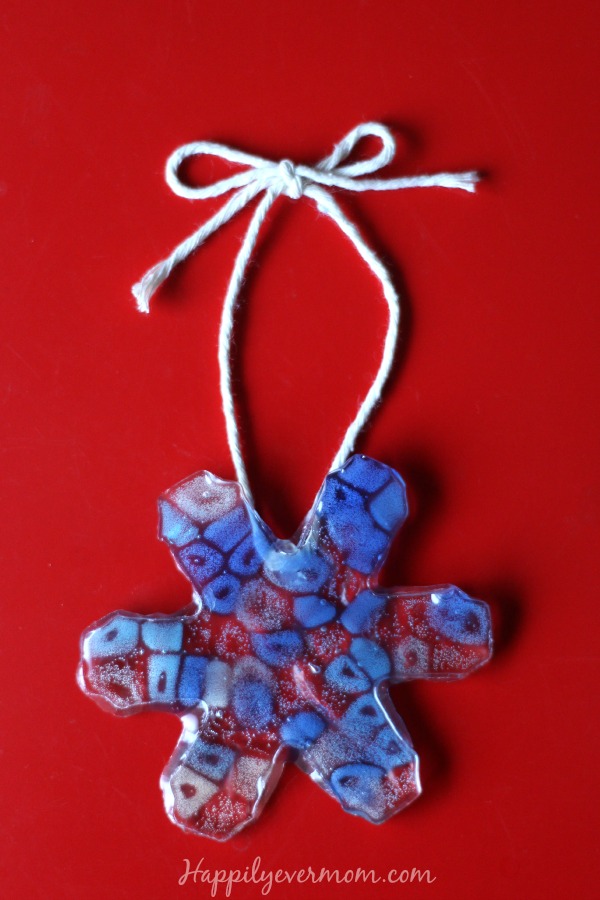
- Place pony beads inside of the metal cookie cutter (DON’T use plastic cookie cutters). Note: My daughter sorted our blues and clear for her snowflake colors before we started.
- Put the cookie cutter and beads inside the oven.
- Melted for around 5-10 minutes and check on the beads. If they look flat and melted (without bumps that still resemble beads), you can take your ornament out. Let it cook a little longer if it isn’t flat, but I don’t like my beads cooking for long.
- Let cool.
- Pop your melted pony bead out of the cookie cutter. You’ll have to really push it out as the plastic sticks to the cookie cutter, but it will come out.
- Hot glue your ribbon or string to the back and you have an ornament!
I know.
That was easier than you thought, right?
Be sure to read these tips below to make it even easier for yourself…
Tips for Melting Pony Beads the BEST Way Possible
- Melt the pony beads in a toaster oven OUTSIDE or on your porch so you don’t smell up your house.
- Have a designated baking sheet for melting beads – pick one up at the dollar store for future projects.
- Always use metal cookie cutters. Plastic cookie cutters will…well….melt or burn. Yuck.
- We used clear pony beads, but any kind of pony bead will do.
- Do a VERY THIN layer of beads in the cookie cutter. If you put too many inside the cookie cutter, you will NOT be able to pop the ornament out of the cookie cutter when it dries.
- Get creative and use the beads around the cookie cutter for a different look!
If you want to make more ornaments, here’s where I pin all of my favorite kid-made ornaments on Pinterest – there are some AWESOME ideas on this board.
Be sure to follow the board HERE: Happily Ever Mom’s board Kid-Made Ornaments on Pinterest.
More Melted Pony Bead Posts from Happily Ever Mom


This is so lovely, clever, and pretty!
Thanks for sharing (and for linking up to the #SHINEbloghop)!
Wishing you a lovely weekend.
xoxo
Thanks so much, Jennifer 🙂
This is a fabulous idea!! How bad does the melting plastic make the house smell?
Hi Heather! It depends on how many you put in the oven and how sensitive you are to the smell,but I like to put my toaster oven outside on the porch to do this activity. 🙂 keeps the smell outside!
Is there a way to leave a hole for twine to hang? Just leave a bead out in the spot for twine perhaps?
Hi Diane! so a couple ideas: you can thread one bead at the top with string that won’t burn when you cook the beads so the thread is just apart of the ornament. Or, you could try cutting off a small part of a straw to put towards the top, but I’m not sure if the straw will melt or not. I’ll try it out and leave a comment here to let you know if it worked or not!! 🙂 – Katie
Roll a small piece of parchment paper and put it in the bead you want the hole to remain in.
Pam that’s a genius idea! Thanks for sharing that here. 🙂